A few weeks ago we talked in Ten DIY's what to do with your son to create toys or decorate his bedroom, on that occasion it was a joint activity with your son, in which you rather collaborated and he was the protagonist of the craft.
Today is quite the opposite, I have prepared seven DIY's for your child's bedroom, fabulous toys, costumes or accessories that will amaze you. However, now I propose that you do it yourself, although in some cases your little one can help you, however I would prefer it to be a surprise, you will leave it speechless.
Indian teepee to hide

We just need 6 bamboo sticks of 1.30 meters, which you can buy at any large DIY store, cut it right there if you don't have the right tools at home, a piece of 1x2 meter cloth, scissors and rope.
First place three of the sticks and ties With a little rope. Then we put the remaining three sticks and fix them well with more rope. Then cut and sew the fabric as indicated by the image pattern. And sew on the ends some clips where to hold the bamboo. Now you can ride it.


Garland for the wall to decorate the bedroom

The garlands are a basic of children's decoration, they are placed everywhere, on a wall, in the head of the bed, in the closet or in a lamp, see how Ten basic ideas remain to be taken into account to decorate the perfect children's bedroom.
Today I tell you how to make one, in this case if your child can help you, you only need rope or wool of the color you want, paper or cardboard with the color or pattern you want and masking tape.


Cut the cardboard into triangles, or in the format you want, whether circles, stars, squares or if you have a die you can use the die to cut the figures, once cut, we will place the triangles upside down and in a row, in the case that the cardboard has a face and back, and with zeal we will hook them one by one with the string. Another option to grab the figure with the string is to use a stapler with colored staples. You are ready to decorate the walls of your child's bedroom, easy, right?
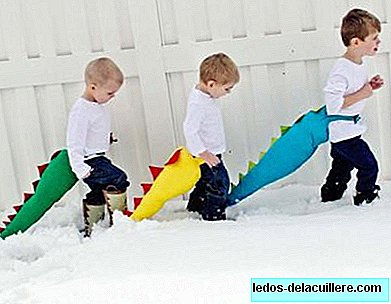
A dinosaur or dragon tail to dress up

For the more adventurous children, I bring a super and imaginative DIY, it's about making a tail of some perverse monster, be it Godzilla, a magical dragon that draws fire or an extinct dinosaur.
For this you need a sewing kit, yellow cotton fabric and red felt, and two velcro strips and padding. Fold the yellow fabric and cut it in the shape of a triangle, as you see in the image, with a length of 56 cm and a width of 28 cm, there are two elongated triangles, fill them and sew one side.


To make the dragon's tail spikes, cut the red felt triangle, seven cm of base by six of height and sew them in one of the sides of the triangle of the main piece of yellow clothes, the one that is not yet sewn, so that they are looking up the peaks or follow the steps of the image.
To make the strap used to grab the tail at the child's waist you need four pieces 30 cm long by eight cm wide and finally you need a circle seven centimeters in diameter.
Take the four pieces and sew them two at a time, once finished you have two pieces left, sew the velcros on these pieces, each at one end at the same height so that they can stick properly. Sew each of these strips into the main pieces, in the yellow triangles, each right in the middle of the part that measures 28 cm.
And then uwe will circle the yellow main piece, which we will sew through the parts that measure 28 cm, we always sew on the inner side, once the tail is turned, and you can close the piece, leaving a hole to put the filling, when you finish filling the tail and close the hole with Be careful not to see the sewing.
Add a funny phrase or word on the walls or door

This fun, decorative and cheap idea You can use it to put their names on the doors of their bedrooms or on the wall, you can write "hello" or the numbers, or any phrase that makes you laugh or dream, yourself.
First choose a source, in this case, it is the MeMima typeface, and write the word "Hello" with a 300-point size and print it on a Din A3, you can put the size you want more or less large, if you do not have a printer or your printer It's not that big you can take it to the copy shop.

Now you must of warp the wire following the course of the printed word, from time to time put your creation on top of the word to verify that you do it well, until you finish the word. To finish with a pencil, surround the two ends of the wire around a pencil to create two circles, one at each end of the word.
And finally take the wool, cord or thread and make a knot in the end, add a little glue to the whole word, do it in sections, so as not to get dirty and in case you do not just throw it away and wind the wool around the wire until the end and make a small Knot at the end of the word. Now you can decorate your wall, hang it by the circles we have made at the ends.
Bed-shaped cushion for the bed

Although I propose this house-shaped design, you can give the way you want, sun, cloud, moon, or without you have more patience of cat, fox or any other animal, in this link you will find lots of ideas: Beautiful selection of cushions with fun shapes.
To do it you need draw the silhouette of a small house with a pencil on the back if you feel bad about drawing, download an image from the internet and print the silhouette on paper, cut this shape twice and sew the two pieces following the silhouette of the house, with the backs of the fabric facing out, leaving a small overture.
Rotate the piece and fill it with cushion padding For the overture we have left, once well filled, we can close carefully so that sewing is not visible. Easy and beautiful, and your child will love it.
Paint the wall with a fir print

Other DIY very simple to perform With a spectacular result is to use templates to decorate a wall of your child's bedroom, in this case I propose this fir, although you can use any design for the template.
Either a star, heart or cloud, you just have to draw it or download it from the internet, print it and cut it with a cutter in an acetate template, do not use paper since when you pass the roller with the paint, it will get wet and at the fourth or fifth pass, you will have run out of template.


If you want to get more ideas of prints I propose that you look at these two links, in them you will find a thousand and one ideas: Ten beautiful ideas of how to decorate the walls of a children's bedroom and illustrations and graphic prints in black and white to decorate your bedroom baby.
To do it you will need an acetate, a cutter, painter's tape, a pencil, a centimeter and paint of the color you want. Once the template is done, think about how you want to distribute the figures on the wall, put pencil marks on the wall, to know where you should go placing the template each time, so that it fits as you want.
You are putting the template on the wall fastened with some painter's tape, use water paint, and with a small roller a little soaked in paint but very dry, that does not drip, and so that the template does not seep below.
A cardboard bed to play

To make this DIY you need cardboard and scissors, you must cut the cardboard pieces and make the indentations as indicated in the image, and finally assemble the bed fitting the pieces through the indentations.
You can decorate the bed with your child, with pencils, markers, colored papers and white glue, washi tape, Aironfix, or anything that comes to mind. It would not hurt if you made a bed with printed fabric and cushion padding.


This week I already proposed a beautiful selection of original toys for your child, in it you will find More ideas to make wonderful cardboard toys, which you can then decorate with your child.
Tutorials | Indian teepee for children, Garland for the wall, A dinosaur tail, Cardboard bed to play, Hello and Paint the wall with a pattern of fir trees. Where to buy | Cushion with house shape In Babies and more | The most current trends to decorate a children's or baby bedroom